


📅 Updated May 8, 2026
Key Takeaways: Garbage Disposal Repair and Prevention
- Always unplug the disposal before attempting any repair, never put your hands inside the unit under any circumstances
- Most garbage disposal problems are caused by the wrong foods going in, such as grease, eggshells, coffee grounds, stringy vegetables, and starchy foods are the most common culprits
- The hex wrench at the bottom of the unit and the reset button resolve the majority of jams without any professional help needed
- A leak from the bottom of the disposal body indicates internal seal failure, a replacement is almost always more cost-effective than repair
- Garbage disposals over 12 years old showing any significant problem are generally better replaced than repaired given the low cost of a new unit installed
A garbage disposal that stops working mid-meal or starts making grinding noises is one of those kitchen problems that demands attention immediately. The good news is that most garbage disposal problems have a clear cause and a straightforward resolution. The more important skill is knowing which problems you can handle yourself in ten minutes and which ones call for a licensed plumber.
Talmich Plumbing & Heating has handled garbage disposal repair and installation across Colorado Springs and the surrounding area as part of our broader plumbing services for over 20 years. This guide covers everything in one place: what not to put in your disposal, how to troubleshoot the most common problems, and when the right call is to pick up the phone rather than reach for a wrench.
Safety Rules Before You Touch Your Disposal
Before addressing any garbage disposal problem, these three steps are non-negotiable regardless of what the issue appears to be.
First, turn the disposal switch to the off position. Second, unplug the disposal from the outlet under the sink. This is the most critical step — a disposal with power to it can activate unexpectedly and the results are serious. Third, never put your hands into the disposal. Use tongs, pliers, or a wooden handle to reach anything inside the unit. These rules apply every time, without exception, whether you are retrieving a dropped utensil or diagnosing a mechanical problem.
What Not to Put in Your Garbage Disposal
Most garbage disposal problems are caused by putting the wrong things down the drain rather than by mechanical failure. Understanding what damages your disposal is the most effective form of prevention. According to the U.S. Environmental Protection Agency, composting and proper food waste disposal habits not only protect your plumbing but also significantly reduce household landfill contributions.
| Item | Why It Damages the Disposal | What to Do Instead |
|---|---|---|
| Grease and cooking oil | Solidifies in drain pipes, causes progressive buildup and clogs | Pour into a sealable container, dispose in trash when solid |
| Eggshells | Create fine granular waste that sticks to pipe walls and accumulates | Compost or trash |
| Coffee grounds | Form a thick paste inside the drain that is difficult to flush out | Compost — grounds are excellent fertilizer |
| Pasta, rice, and beans | Expand when wet, swell inside the drain and create clogs | Trash or compost |
| Celery, banana peels, onion skins | Stringy fibers wrap around the impeller and cause jams | Compost or trash |
| Potato peels | Dense starch creates a paste that coats the drain and grinding components | Compost or trash |
| Bones, pits, and hard shells | Too hard for disposal blades — damage or dull grinding components | Trash |
| Nuts and peanut butter | Ground into a thick paste that clogs the drain | Trash |
| Non-food items (paper, sponges, packaging) | Jam the mechanism and can damage the motor | Trash — disposals are for food waste only |
One important note on portion size: even foods that are safe for the disposal can cause problems if fed in large amounts at once. Always run cold water before turning the disposal on, feed food in small amounts, and keep the water running for 30 to 60 seconds after the grinding stops to fully flush the drain line.
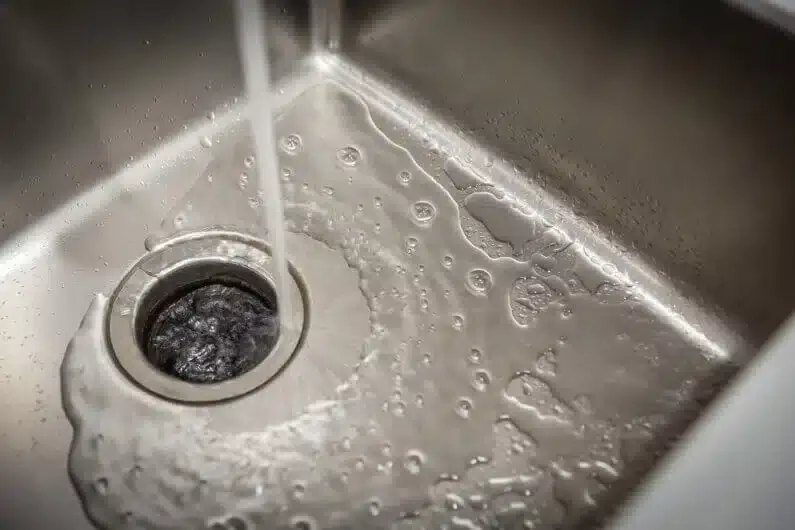
Troubleshooting a Garbage Disposal That Stopped Working
When your garbage disposal stops working, the cause is almost always one of a handful of common problems. Work through the steps below in order before calling for garbage disposal repair. Always unplug the unit before attempting any of these steps.
Step 1: Check for a Foreign Object or Overload
With the disposal unplugged, use a flashlight to look down into the unit. If you can see a foreign object such as a utensil, bone, or bottle cap lodged in the grinding chamber, use tongs or needle-nose pliers to remove it. Never reach in with your hand.
If no object is visible but the disposal was running heavily before it stopped, it may have tripped its internal overload protector. This is the disposal’s built-in circuit breaker. Give the unit ten to fifteen minutes to cool down before proceeding to Step 5.
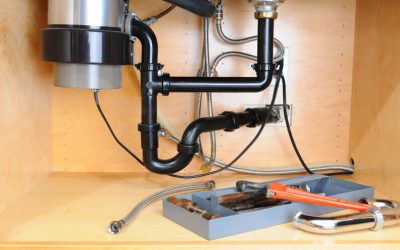
Step 2: Use the Hex Wrench at the Bottom
Every garbage disposal ships with a small hex wrench, also called an Allen wrench, designed specifically for this purpose. You will find the hex socket at the center of the bottom of the unit under the sink. Insert the wrench and work it back and forth to manually free the impeller plate if it is jammed. A few turns in each direction is usually sufficient to dislodge stuck debris.
If you no longer have the original wrench, a standard 1/4-inch hex wrench from any hardware store will work. This step resolves a large percentage of garbage disposal jams without any further action needed.
Step 3: Press the Reset Button
After using the hex wrench, look for a small red or black button on the bottom of the unit. This is the reset button for the overload protector. Press it firmly until you feel it click. If the button does not stay depressed, the disposal is still too hot and needs more time to cool.
With the reset button pressed in, plug the disposal back in, run cold water, and turn it on. This resolves many disposal problems that appear serious but are actually just overload shutdowns.
Step 4: Try Turning the Impeller From Above
If the hex wrench and reset button did not fully free the jam, try working the impeller from above using the handle of a wooden spoon. Insert the handle into the grinding chamber, brace it against the impeller, and work it back and forth. Remove the spoon handle completely before plugging the unit back in and testing.
Step 5: Clean the Trap Under the Sink
If the disposal runs but drains slowly or not at all, the problem may be in the drain trap rather than the disposal itself. The P-trap is the curved section of pipe beneath the sink that connects the disposal to the drain line. Clogs can accumulate in this bend over time.
Place a bucket under the trap, loosen the slip nuts holding the curved pipe in place, and remove it. Clean out any debris and reassemble. Run water through the sink to confirm drainage is restored before using the disposal again.
Step 6: Run Adequate Water
Many disposal problems stem from insufficient water flow rather than mechanical failure. Cold water should be running before the disposal is turned on, during operation, and for at least 30 seconds after the food is gone. Hot water is not recommended because it can liquefy grease that then re-solidifies further down the drain line.
Step 7: Practice Batch Feeding
If the disposal is working but sluggish, overloading is likely the cause. Feed food waste into the disposal in small batches rather than all at once. Allow the disposal and water to clear each batch before adding more. This is especially important for fibrous foods and larger volumes of scraps.
Step 8: Check for Leaks After Repairs
After any disposal repair, run water through the unit and inspect the connections around the sink flange, the drain hose connection, and the pipe fittings below. If you notice dripping at the sink flange, the plumber’s putty seal may need to be refreshed. Tighten any loose fittings and confirm no water is present before considering the repair complete.
Step 9: Clean the Disposal Regularly
Ongoing maintenance prevents future problems. Once a week, run a handful of ice cubes through the disposal to clean the grinding components and sharpen the impellers. Cutting a lemon or lime into quarters and running it through freshens the drain and reduces odor buildup. Avoid commercial drain cleaners inside the disposal as the chemicals can damage the rubber seals and internal components over time.
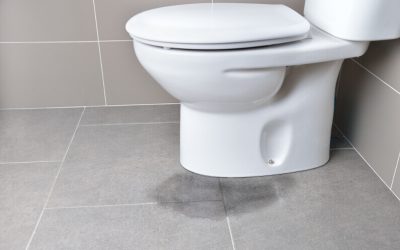
Troubleshooting a Garbage Disposal That Is Leaking
Garbage disposal leaks fall into three categories and each points to a different source.
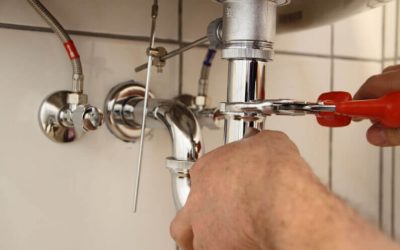
A leak at the top of the unit where it connects to the sink flange is usually a failed plumber’s putty seal. Disconnecting the disposal, cleaning the flange area, applying fresh putty, and reassembling typically resolves this type of leak. This is a manageable DIY repair for a homeowner comfortable with basic plumbing disassembly.
A leak from the side of the unit at one of the drain line connections is usually a loose connection or a failed gasket. Tightening the connection or replacing the gasket is straightforward on most models.
A leak from the bottom of the disposal body itself is a different situation. This typically indicates a failed internal seal around the motor or a crack in the housing. Internal seal failure on a garbage disposal is generally not worth repairing — the cost of parts and labor approaches or exceeds the cost of a new unit. If water is dripping from the bottom of the disposal body, replacement is almost always the right call.
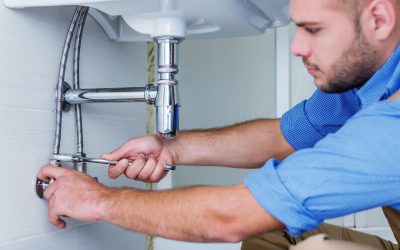
When to Call a Plumber in Colorado Springs
Several garbage disposal situations call for a professional rather than a DIY attempt. Calling a plumber early typically costs less than addressing the downstream damage caused by a delayed repair.
Call Talmich Plumbing & Heating if the disposal makes a loud grinding or metallic noise even after the impeller has been freed. This indicates a damaged grinding component that requires professional assessment.
If the unit hums when turned on but the hex wrench and reset button have not resolved the jam after two attempts, the motor or capacitor may be failing and the unit likely needs replacement.
If the drain line beneath the sink backs up into the sink basin when the disposal runs, the problem is likely a clog deeper in the drain line beyond the P-trap, which requires professional clearing.
Any electrical issues such as a tripped breaker that keeps retripping when the disposal is plugged in should be handled by a licensed professional and not attempted as a DIY repair.
Repair vs Replace: When a New Disposal Makes More Sense
Garbage disposals are relatively inexpensive appliances compared to other kitchen fixtures. A quality unit runs $150 to $350 for the disposal itself, and professional installation typically adds $100 to $200 in labor. That total of $250 to $550 installed is worth keeping in mind when evaluating repair costs.
| Situation | Repair or Replace? | Reasoning |
|---|---|---|
| Simple jam, unit under 8 years old | Self-repair | Hex wrench and reset button resolve most jams |
| Leak at sink flange or side connections | Repair | Putty or gasket replacement is low cost |
| Leak from bottom of disposal body | Replace | Internal seal failure — repair cost exceeds replacement |
| Motor humming but not spinning, repeated jams | Evaluate age – likely replace | Motor or capacitor failure on older unit favors replacement |
| Unit over 12 years old, any significant problem | Replace | Parts availability and repair cost favor a new unit |
| Persistent loud grinding despite cleared jams | Replace | Damaged grinding components — not cost-effective to repair |
If your garbage disposal is under warranty, check the manufacturer’s documentation before scheduling any repair. InSinkErator and Moen both offer multi-year warranties on residential units that may cover parts or the full unit depending on the failure type and the age of the installation.
For garbage disposal installation or replacement in Colorado Springs, Talmich Plumbing & Heating handles the full job including disconnecting the old unit, ensuring the drain line and electrical connection are in good condition, and installing and testing the new disposal. If you are also considering a kitchen remodeling project, a disposal upgrade is a natural part of that work.
Garbage Disposal Repair or Replacement in Colorado Springs
If you have worked through the troubleshooting steps above and the problem persists, or if the unit is leaking from the body or showing signs of motor failure, Talmich Plumbing & Heating can diagnose and resolve it in a single visit. We handle garbage disposal repair and replacement throughout Colorado Springs and surrounding communities.
We serve Colorado Springs, Monument, Black Forest, Fountain, Security-Widefield, Cimarron Hills, and surrounding communities.
Schedule a Plumbing Service Call
Or call us directly: 719-822-0448 | Monday through Friday, 8am to 5pm
Frequently Asked Questions (FAQs)
These are the questions Colorado Springs homeowners most commonly ask about garbage disposal repair and replacement. If your situation is not covered below, call Talmich Plumbing & Heating at 719-822-0448 and we will walk you through it.
Why is my garbage disposal humming but not working?
A disposal that hums but does not spin has power but the impeller is jammed. Unplug the unit first. Then insert the hex wrench into the socket at the bottom of the disposal and work it back and forth to free the impeller. Press the reset button on the bottom of the unit, plug it back in, run cold water, and try again. This resolves the majority of humming-but-not-spinning problems.
How much does garbage disposal repair cost in Colorado Springs?
Simple repairs like clearing a jam or replacing a drain gasket typically run $75 to $150 in labor when handled by a plumber. If the unit needs replacement, a quality garbage disposal runs $150 to $350 for the unit itself plus $100 to $200 for installation labor, bringing the total to roughly $250 to $550 installed depending on the model selected.
How long does a garbage disposal last?
A well-maintained garbage disposal typically lasts 10 to 15 years. Units that regularly receive the wrong foods, run without adequate water, or are never cleaned tend to fail sooner. If your disposal is over 12 years old and experiencing repeated problems, replacement is usually the more cost-effective path compared to ongoing repairs.
Can I replace a garbage disposal myself?
A straightforward like-for-like replacement on an existing mount is within reach for a homeowner comfortable with basic plumbing and electrical disconnections. However, any work that involves modifying the drain line, updating the electrical connection, or installing a disposal where none existed before should be handled by a licensed plumber to ensure the work meets Colorado plumbing code requirements.
Why does my garbage disposal smell bad?
Odors typically come from food residue coating the grinding chamber, the impeller, and the underside of the rubber splash guard. Run ice cubes through the disposal weekly to clean the grinding components. Cut a lemon or lime into quarters and run it through to neutralize odor. Lift the rubber splash guard and clean underneath it with a brush and dish soap — this area traps food debris and is frequently overlooked.


0 Comments